
How it works
About Paymark Global
Paymark Global is a leading eSIM provider offering reliable and flexible connectivity solutions for travelers and businesses worldwide. We simplify mobile access with instant activation, global coverage, and seamless digital experiences.

Setting up eSIM on iPhone (XR/XS and newer)
iPhones from the XR/XS generation onward (2018+) support eSIM. U.S. iPhone 14 and newer models are eSIM-only. Here’s how to install your eSIM profile:
Method 1: Scan QR code (recommended)
- Open Settings
Tap the Settings app on your home screen.
- Navigate to Cellular
Tap Cellular (or Mobile Data in some regions).
- Add eSIM
Tap Add Cellular Plan or Add eSIM. Your camera will activate to scan a QR code.
- Scan the QR code
Position your phone camera over the QR code provided by your eSIM provider. It should be recognized automatically within a few seconds.
- Add cellular plan
Once detected, tap Add Cellular Plan at the bottom of the screen. The eSIM profile will download over Wi-Fi.
- Label your eSIM
Give your new plan a recognizable name like “Travel – Japan” or “Holafly Europe.” This helps you identify it later if you have multiple plans.
- Choose default line
Select which line you want to use for cellular data. For travel, you’ll typically choose the new eSIM for data and keep your home SIM for calls.
- Complete setup
Tap Continue through the remaining prompts. Your eSIM is now installed and ready to activate.
Method 2: Manual entry
If you have activation details instead of a QR code, or if the camera won’t scan properly:
- Follow steps 1-3 above to reach the QR code scanner
- Tap Enter Details Manually at the bottom
- Enter the SM-DP+ Address and Activation Code provided by your eSIM provider
- Tap Next and follow the remaining prompts
Method 3: eSIM Quick Transfer (iOS 16+)
If you’re upgrading to a new iPhone and have iOS 16 or later, you can transfer your eSIM from your old device:
- During setup of your new iPhone, choose Transfer from iPhone
- Follow the prompts to transfer your eSIM along with other data
- Alternatively, go to Settings → Cellular → Add eSIM and choose Transfer from Nearby iPhone
Setting up eSIM on Android
The exact steps for Android vary by manufacturer and Android version, but the general process is similar across devices. These instructions work for most Android 9+ devices:
General Android setup
- Open Settings
Tap the Settings app in your app drawer.
- Navigate to Network settings
Look for Network & Internet, Connections, or SIM card manager(varies by manufacturer).
- Access SIM settings
Tap SIMs, Mobile Network, or SIM card manager.
- Add eSIM
Look for Add mobile plan, Add eSIM, or a + icon. Some devices may say Download a SIM instead.
- Scan QR code
Select Scan QR code and position your camera over the code provided by your eSIM provider.
- Download profile
Tap Add or Download to install the eSIM profile. This requires a Wi-Fi connection.
- Enable the eSIM
Once downloaded, toggle the eSIM on if it isn’t enabled automatically. You may need to restart your device.
- Set as mobile data
Go back to SIM settings and set your new eSIM as the preferred line for Mobile data.
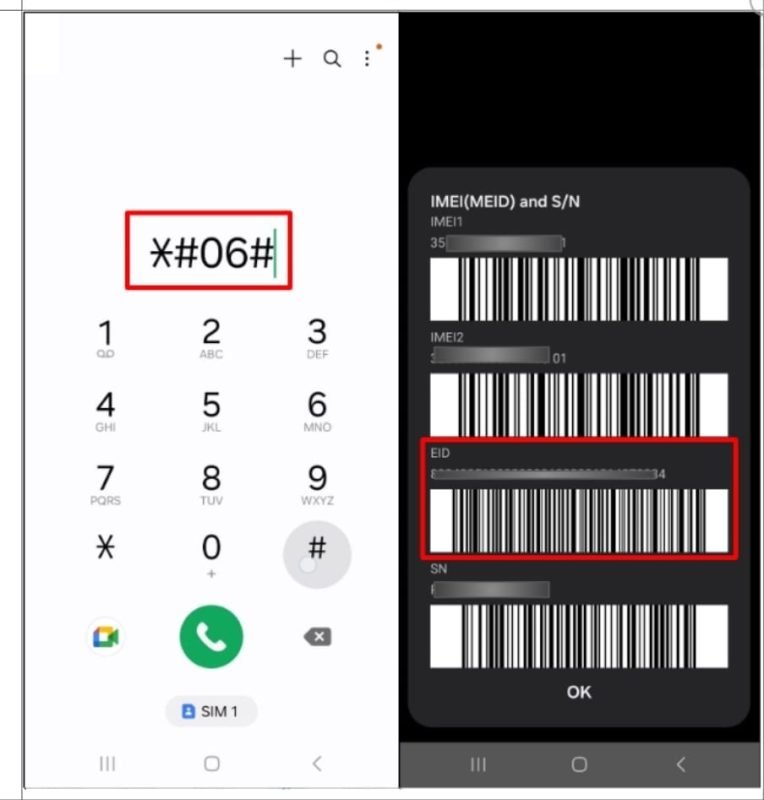
Setting up eSIM on Samsung Galaxy
Samsung Galaxy S20 and newer (plus select Galaxy Z Fold/Flip models) support eSIM. Samsung’s One UI interface has a slightly different layout:
- Open Settings
Tap the Settings app.
- Go to Connections
Tap Connections near the top of Settings.
- Select SIM card manager
Tap SIM card manager (or SIM manager).
- Add mobile plan
Tap Add mobile plan or Add eSIM.
- Scan QR code
Choose Scan QR code from service provider and scan your eSIM QR code.
- Add the plan
Tap Add to download the profile. Wait for it to complete.
- Enable and configure
Toggle the eSIM on, give it a name, and set it as your preferred data line in SIM card manager.
Setting up eSIM on Google Pixel
Google Pixel devices (Pixel 3 and newer) have excellent eSIM support. Pixel 7 and newer also support converting your physical SIM to eSIM:
Installing a new eSIM
- Open Settings
Tap Settings from your app drawer.
- Go to Network & internet
Tap Network & internet.
- Select SIMs
Tap the + icon next to “SIMs” or tap Add more.
- Download a SIM
Choose Download a SIM instead?
- Scan QR code
Tap Next and scan your eSIM QR code.
- Download and enable
Tap Download, wait for the profile to install, then tap Done.
- Set preferences
Choose which SIM to use for mobile data, calls, and SMS in your SIM settings.
Converting physical SIM to eSIM (Pixel 7+)
Pixel 7 and newer models can convert your existing physical SIM to an eSIM, freeing up the SIM slot:
- Go to Settings → Network & internet → SIMs
- Select your physical SIM and tap Convert to eSIM
- Follow the prompts to complete the conversion (requires carrier support)
- Once complete, you can remove the physical SIM card
Activating your eSIM and configuring settings
After installing your eSIM profile, you need to configure when and how it’s used. This is especially important for travelers managing both a home SIM and travel eSIM:
When to activate
Most travel eSIM plans start their validity period when you first turn them on, not when you install them. Best practices:
- Install before your trip while you have reliable Wi-Fi at home
- Keep the eSIM turned off until you reach your destination
- Activate when you land by toggling it on in your settings
- Turn off data roaming on your home SIM to avoid roaming charges
Dual SIM configuration
If you’re using both your home SIM and a travel eSIM, configure your device to use each for different purposes:
Home SIM (physical):
- Use for: Voice calls, SMS (receiving verification codes)
- Turn OFF: Data roaming, mobile data
Travel eSIM:
- Use for: Mobile data, internet apps
- Turn ON: Mobile data, data roaming (if required)
Data roaming settings
Some eSIM providers require data roaming to be enabled even though you’re using a local network profile. Check your provider’s instructions:
- iPhone: Settings → Cellular → [Your eSIM] → Data Roaming (toggle on if required)
- Android: Settings → Network & Internet → SIMs → [Your eSIM] → Roaming (toggle on if required)
Troubleshooting common eSIM issues
Most eSIM setups work smoothly, but here are solutions to common problems you might encounter:
Solutions:
- Ensure you’re in good lighting and the QR code is clearly visible
- Try zooming in or out on the QR code if viewing on another device
- Use manual entry instead (choose “Enter Details Manually”)
- Screenshot the QR code and try scanning from your photo library
- Clean your camera lens
Solutions:
- Verify you’re connected to stable Wi-Fi
- Check that your device is carrier unlocked
- Ensure you haven’t already installed this eSIM (most QR codes work only once)
- Restart your device and try again
- Check for iOS/Android system updates and install them
- Contact your eSIM provider for a new QR code if needed
Solutions:
- Verify the eSIM is turned on and set as your mobile data line
- Enable data roaming for the eSIM if required by your provider
- Toggle airplane mode on and off to reconnect to the network
- Restart your device
- Check if your plan has been activated (some require manual activation)
- Verify you’re in a coverage area supported by your plan
- Try manually selecting a network: Settings → Cellular/Mobile → Network Selection
Solutions:
- Check if your plan has data caps or speed throttling after certain usage
- Verify you’re in an area with good network coverage
- Try selecting a different network manually if multiple are available
- Disable VPN temporarily to test if it’s causing slowdowns
- Reset network settings (Settings → General → Transfer or Reset iPhone → Reset → Reset Network Settings)
Remember: Most travel eSIMs are data-only and don’t support voice calls or SMS. Solutions:
- Use internet calling apps like WhatsApp, Skype, or FaceTime for voice calls
- Keep your home SIM active for receiving calls if you have dual SIM
- Check if your provider offers voice add-ons
- Enable Wi-Fi calling on your home SIM if supported by your carrier
Solutions:
- This may indicate the plan has expired or hasn’t been activated yet
- Check your plan’s validity dates and remaining data in the provider’s app
- Contact your eSIM provider to verify the status
- If the plan is genuinely invalid, you may need to purchase a new one


Your Global eSIM Connection
Paymark Global offers seamless eSIM solutions, keeping you connected anywhere in the world without physical SIMs.
Our Strategy Is To Provide Our Customers With Quality Products
If the copy becomes distracting in the design then you are doing something wrong or they are discussing copy changes. It might be a bit annoying but you could tell them that that discussion would be best suited. You begin with a text, you sculpt information, you chisel away what’s not needed, you come.
Then the question arises: where’s the content? Not there yet? That’s not so bad, there’s dummy copy to the rescue. But worse, what if the fish doesn’t fit in the can, the foot’s to big for the boot? Or to small? To short sentences, to many headings, images too large for the proposed design, or too small, or they fit in but it looks iffy for reasons the folks in the meeting can’t quite tell right now, but they’re unhappy, somehow. A client that’s unhappy for a reason is a problem, a client that’s unhappy though.

Global Connectivity
Chances are there wasn’t collaboration and checkpoints, there wasn’t a process.

Instant activation
Activate your eSIM instantly without visiting a store.

Flexible plans
Choose from a variety of data and voice plans tailored to your needs.
Why Buy from Paymark Global
Choose Paymark Global for reliable eSIM solutions with instant activation, wide global coverage, and secure connectivity. We’re committed to delivering seamless mobile experiences wherever you go.
Supported eSIM Devices
Apple
iPhone
iPhone 17 Pro Max,iPhone 17 Pro
iPhone 17
iPhone 17 Air
iPhone 16 Pro Max
iPhone 16 Pro
iPhone 16 Plus
iPhone 16
iPhone 15
iPhone 15 Plus
iPhone 15 Pro
iPhone 15 Pro Max
iPhone 14
iPhone 14 Plus
iPhone 14 Pro
iPhone 14 Pro Max
iPhone 13
iPhone 13 Mini
iPhone 13 Pro
iPhone 13 Pro Max
iPhone 12
iPhone 12 Mini
iPhone 12 Pro
iPhone 12 Pro Max
iPhone 11
iPhone 11 Pro
iPhone 11 Pro Max
iPhone XS
iPhone XS Max
iPhone XR
iPhone SE (2020)
iPhone SE (2022)
iPad
iPad Pro 11-inch 3rd Gen (WiFi + Cellular)
iPad Pro 11-inch 3rd Gen (1TB, WiFi + Cellular)
iPad Pro 12.9-inch 3rd Gen (WiFi + Cellular)
iPad Pro 12.9-inch 3rd Gen (1TB, WiFi + Cellular)
iPad Pro 11-inch 4th Gen (WiFi + Cellular)
iPad Pro 12.9-inch 4th Gen (WiFi + Cellular)
iPad Pro 12.9-inch 5th Gen
iPad Pro 12.9-inch 6th Gen
iPad Pro 11-inch 4th Gen
iPad mini 5th Gen
iPad Air 3rd Gen
iPad Air 4th Gen (WiFi + Cellular)
iPad Air 5th Gen (WiFi + Cellular)
iPad 8th Gen (WiFi + Cellular)
iPad 10th Gen
Apple Watch
Apple Watch Series 3 (GPS + Cellular)
Apple Watch Series 4 (GPS + Cellular)
Apple Watch Series 5 (GPS + Cellular)
Apple Watch Series 6 (GPS + Cellular)
Apple Watch Series 7 (GPS + Cellular)
Apple Watch Series 8 (GPS + Cellular)
Apple Watch Series 9 (GPS + Cellular)
Apple Watch Ultra LTE
Apple Watch Ultra 2
Google Pixel
Pixel 10 / 10 Pro / 10 Pro XL / 10 Pro Fold
Pixel 9 / 9a / 9 Pro XL / 9 Pro Fold
Pixel 8 / 8a / 8 Pro
Pixel Fold
Pixel 7 / 7a / 7 Pro
Pixel 6 / 6a / 6 Pro
Pixel 5 / 5a
Pixel 4 / 4a / 4 XL
Pixel 3 / 3a / 3 XL / 3a XL
Samsung
Galaxy S25 / S25+ / S25 Edge / S25 Ultra
Galaxy S24 / S24+ / S24 Ultra / S23 FE / S24 FE
Galaxy S22 / S22+ / S22 Ultra
Galaxy S21 / S21+ / S21 Ultra
Galaxy S20 / S20+ / S20 Ultra
Galaxy Z Fold / Fold2 / Fold3 / Fold5 / Fold7
Galaxy Z Flip / Flip3 / Flip5 / Flip7 / Flip7 FE
Galaxy Note20 / Note20 Ultra
Galaxy A35 / A54 / A55 / A56
Galaxy XCover7 Pro
Galaxy Watch4 / Watch4 Classic
Motorola
Moto G (2024 / 2025)
Moto G Power (2024 / 2025)
Moto G34 / G35 / G53 / G53 5G / G54 5G / G75 / G85
Moto G Stylus 5G
ThinkPhone 25
Razr / Razr+ / Razr 5G / Razr 40 / 40 Ultra
Razr 50 Ultra / Razr 60 / Razr 60 Ultra
Edge / Edge+
Edge 40 Neo / 40 Pro
Edge 50 / 50 Neo / 50 Fusion / 50 Pro / 50 Ultra
Edge 60 / 60 Fusion / 60 Pro / 60 Stylus
HONOR
HONOR Magic4 Pro
HONOR Magic5 Pro
HONOR Magic6 Pro / Magic6 Pro RSR
HONOR Magic7 / 7 Pro / 7 Lite / 7 RSR
HONOR Magic V2 / V2 RSR / V3 / Vs3
HONOR 90
HONOR 200 / 200 Pro
HONOR 400 Lite
Xiaomi
Xiaomi 15 / 15 Pro / 15 Ultra / 15T Pro
Xiaomi 14 / 14 Pro / 14T / 14T Pro
Xiaomi 13 / 13 Lite / 13 Pro / 13T / 13T Pro
Xiaomi 12T Pro
Redmi Note 13 Pro / 13 Pro+
Redmi Note 14 Pro / 14 Pro+
Poco X7
Huawei
P40
P40 Pro*
Mate 40 Pro
Huawei Pura 70 Pro
OnePlus
OnePlus 11 5G
OnePlus 12 / 12R / 13 / 13R / 13T
OnePlus Open / Open 2
OPPO
Reno 5A / Reno 9A
Reno 13 / Reno 13 Pro
Reno6 Pro 5G
Find N2 Flip / N3 / N3 Flip
Find X3 / X3 Pro
Find X5 / X5 Pro
Find X8 / X8 Pro
Find X9 / X9 Pro
Oppo A55s 5G
Sony
Xperia 1 IV / 1 V
Xperia 5 IV / 5 V
Xperia 10 III Lite / 10 IV / 10 V
Xperia Ace III
Nokia
Nokia G60 5G
Nokia X30 5G
Nokia XR21
vivo*
X80 Pro / X90 Pro* / X100 Pro
X200 / X200 Pro / X200s
V29 / V29 Lite 5G*
V40 / V40 SE
V50
SHARP
AQUOS R7 / R8 / R8 Pro / R8s Pro
AQUOS sense4 lite / sense6s / sense7 / sense7 plus / sense8
AQUOS wish / wish2 / wish3
AQUOS zero 6
Simple Sumaho 6
RAKUTEN
Rakuten Big
Rakuten Big S
Rakuten Mini
Rakuten Hand
HAMMER
Hammer Explorer PRO
Hammer Blade 3 / Blade 5G / Blade V 5G
Hammer Construction
Windows 10 / Windows 11 Laptops
Acer
Acer Spin 7
Acer Swift 3 / Swift 7
Acer TravelMate P2 / P6 / Spin P4
ASUS
ASUS Mini Transformer T103HAF
ASUS NovaGo TP370QL
ASUS TransBook Mini
ASUS VivoBook Flip 14 TP401NA
Dell
Dell Latitude 7210 / 7310 / 7320
Dell Latitude 7410 / 9420 / 9440 / 9510
Dell Latitude 5410 / 5420 / 5411 / 5511
HP
HP Elite Dragonfly G2
HP Elite Folio 13
HP EliteBook G5
HP ProBook G5
HP ZBook G5
HP Spectre Folio 13
HP Spectre x360
Lenovo
ThinkPad X1 Carbon Gen 9
ThinkPad X1 Fold / X1 Nano / X1 Titanium Yoga
ThinkPad X12 Detachable
Lenovo Flex 5G
Lenovo Yoga C630 / 520 / 720
Lenovo Miix 630
Microsoft Surface*
Surface Pro 5 LTE Advanced
Surface Pro 7+ / 8 / 9
Surface Pro X / Pro LTE
Surface Go 2
Samsung
Galaxy Tab Active5 / Active5 Pro
Galaxy Tab S9 Ultra
Galaxy Tab S10 Ultra / S10 FE
Galaxy Tab A9
Galaxy Book 2 / Book 3